Alerts
The Alerts screen lets you set up audio clips and text-to-speech announcements that trigger automatically during your tournament based on conditions you define.
Alert list
Section titled “Alert list”Every tournament starts with a set of built-in alerts covering blind and ante changes, breaks, knockouts, and the hand timer. Each alert in the list shows:
- Bell icon — Tap to enable or disable the alert
- Alert name — Descriptive title
- ⋮ menu — Duplicate or delete the alert
- Drag handle — Reorder alerts by dragging
Alerts play in the order they appear in the list. Drag them to change that order — position doesn’t decide whether an alert fires, only when it’s heard.
Adding an alert
Section titled “Adding an alert”Type a name in the New alert title field at the bottom of the list, then tap Add alert — either the bell on the left or the + on the right — or press Return. Both buttons stay disabled until the name is filled in and unique within the tournament.
Duplicating an alert
Section titled “Duplicating an alert”To build a variation on an alert you already have, tap its ⋮ menu and choose Duplicate. The copy appears directly below the original, carrying the same condition, actions, and enabled state, and it is named after the alert it came from: a copy of blinds changed is called blinds changed copy, and the next one blinds changed copy 2. Rename it from its detail screen.
Actions have the same menu inside an alert’s detail screen, so a text-to-speech line can be duplicated and reworded rather than built again from scratch.
Editing an alert
Section titled “Editing an alert”Tap an alert to open its detail screen, where you can configure:
The alert’s display name.
Condition
Section titled “Condition”A trigger expression that determines when the alert fires. This is an expression that evaluates to true or false using tournament values — see Scripting for the language, and Tournament data for everything you can reference.
Tap the Script explorer button — the { } icon in the app bar — to browse the tournament values you can reference.
The result display below the condition field shows what the expression currently evaluates to, or an error message if there’s a syntax problem.
Firing once instead of every second
Section titled “Firing once instead of every second”The condition is checked roughly once a second while the timer is running, and the alert triggers every time it evaluates to true. So a simple condition like currentLevel.bigBlind >= 100 fires once per second for the whole time the big blind is 100 or more.
becameTrue(...) is usually the fix. Wrap the whole condition in it and the alert triggers at the instant that condition first becomes true, instead of for as long as it stays true:
becameTrue(currentLevel.bigBlind >= 100)— triggers once, at the moment the big blind first reaches 100becameTrue(currentPlayerCount == 3)— triggers once, at the moment exactly 3 players remainbecameTrue(secondsLeftInLevel <= 60) && currentLevel.isBlindLevel— triggers once, at the moment one minute remains in a blind level
Two related functions cover the rest:
changed(x)— true at the moment a value becomes different from what it was.changed(levelIndex)is a level change;changed(payouts.first)is the top prize moving.was(x)— the value itself, a second ago, for when you want to compare it yourself.currentPlayerCount < was(currentPlayerCount)is “somebody just busted”, which neither of the other two says as directly.
All three take an expression, so anything you can write on its own goes inside, however deep: was(currentLevel.bigBlind), changed(log.entries.last.dt), becameTrue(totalChipsInPlay / currentPlayerCount < 10000). What they don’t reach is a value you assigned yourself earlier in the condition, or the hand timer: for the hand timer, use previousHandTimer.
More conditions to copy, including the built-in knockout trigger, are on the Examples page.
Actions
Section titled “Actions”Each alert can have multiple actions that play in sequence when the condition is met. Tap Add action to choose between:
- Audio clip — Play a sound file
- Text-to-speech — Speak a text announcement
Once at least one action is enabled, a Preview (▶) button appears in the app bar. Tap it to hear every enabled action play in sequence — exactly what players will hear when the condition triggers.
Audio alerts
Section titled “Audio alerts”When editing an audio alert, you can select from:
- Custom — Your own uploaded MP3 or WAV files (requires a signed-in account, up to 10 files)
- Music clips — 8 built-in music selections
- Accents — 6 built-in accent sounds
- Sound effects — 11 built-in effects
Tap a clip to select it; a checkmark marks the current selection. To hear it, tap the ▶ button that appears on the selected clip.
To upload your own, tap Add audio — or Upload audio if you don’t have any custom files yet — and pick a file from your device. Swipe left on a custom file to delete it; you’ll be asked to confirm.
Text-to-speech alerts
Section titled “Text-to-speech alerts”TTS alerts speak dynamic text using the device’s speech engine. You can configure:
- TTS voice language — Choose from the TTS languages available on your device
- Voice — Pick a specific voice within that language
- TTS text — The announcement to speak. Supports live tournament data in double curly braces, for example:
The big blind is now {{ currentLevel.bigBlind }}or{{ currentPlayerCount }} players remain
The output panel at the bottom shows the rendered text after substitution. Tap Preview (▶) in the app bar to hear it.
Choosing a voice
Section titled “Choosing a voice”The voice list is grouped by region, with your own region at the top, so English - United States comes before English - United Kingdom if that’s where you are. Within each group the voices that work without an internet connection come first.
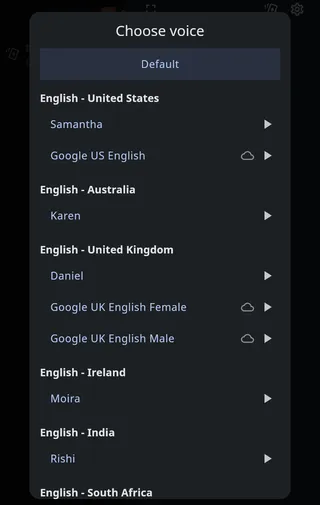
A cloud icon marks a voice that speaks over the internet. Those often sound better, but they need a connection for every announcement and take a moment to start. Over a long tournament night on venue wi-fi, an offline voice is the safer pick.
If your device has them, two more sections sit below the list:
- Alternative voices — the robotic voices some devices install for screen reader users. They are real voices in many languages, but few people would want one calling the blinds.
- Novelty voices — the joke voices, which can’t speak normally at all.
Tap ▶ beside any voice to hear it first. The sample is spoken in the language you’re choosing, not the language the app is in, so you can judge how that voice handles the language you’ll actually announce in.
Your choice applies to every TTS alert in that language on this device, not only the alert you’re editing.
Volume
Section titled “Volume”Alerts play on the media volume, the same one music and video use, not the ringer. That’s deliberate: it means announcements are still heard on a phone whose ringer is silenced.
The catch is that on both Apple and Android devices, the volume buttons don’t always reach the media volume. While a sound is actually playing they do. When nothing is playing they usually move the ringer instead, and an alert lasts a second or two, so most attempts to set the level land on the wrong volume.
The reliable way to set it is to make a sound and adjust while it plays. Open any alert and tap Preview (▶) in the app bar, then press volume up while you hear it. The media volume is remembered, so every alert after that comes out at the new level. Doing this before players arrive beats trying to catch a real announcement mid-tournament.
If you’d rather not think about it again:
- On Apple devices, turn off Change with Buttons in Settings › Sounds & Haptics. The buttons then always control the media volume. Note that the “Alerts and System Sounds” section on that same screen refers to iOS’s own alerts, like incoming texts and keyboard clicks, and has no effect here.
- On Android devices, press a volume button and then tap the arrow or gear on the volume panel to expand it. That reveals a separate Media slider you can set directly.
- In a web browser, the page follows your computer’s system volume and the tab’s own mute control.
The app has its own mute, separate from the device. Open the menu (☰), tap the gear, and set Mute audio. It’s all or nothing, so use the device’s media volume for anything in between.
Two things worth knowing about it. It applies only to the device you set it on, which is how you keep a phone that scanned a QR code from announcing along with the main timer. And it resets to unmuted each time the app starts, so a device you want kept quiet needs muting again after a restart.
Reordering, duplicating, and deleting
Section titled “Reordering, duplicating, and deleting”- Reorder alerts — Drag the handle on any alert in the main list
- Reorder actions — Drag actions within an alert’s detail screen
- Duplicate an alert or action — Tap its ⋮ menu and choose Duplicate
- Delete an alert — Swipe left on the alert in the main list, or use its ⋮ menu
- Delete an action — Swipe left on the action in the detail screen, or use its ⋮ menu
Enable and disable
Section titled “Enable and disable”Tap the leading icon on any alert or action to toggle it. Alerts show a bell; actions show a music note (audio clip) or a speaking head (text-to-speech), each switching to a crossed-out version when disabled. Disabled alerts and actions are skipped during playback.
Undo and redo
Section titled “Undo and redo”Every alert edit can be undone. Undo (↶) and Redo (↷) buttons sit in the app bar of each alerts screen — the main list, an alert’s detail screen, and the audio and text-to-speech editors — so you can step back from wherever you made the change.
Undo covers everything: adding, duplicating, and deleting alerts, renaming, reordering, enabling and disabling, editing a condition or an action, resetting to defaults, and importing. A swiped-away alert comes back with one tap.
A few details worth knowing:
- Typing counts as one step. Edits to the same field made in quick succession merge into a single undo, so undoing a title doesn’t walk back a letter at a time.
- The history outlives the screen. It lasts for as long as the app is running, so leaving the Alerts screen and coming back later doesn’t lose it. Up to 30 edits are kept.
- Redo appears only when there’s something to redo. Undo stays in place and goes grey once you reach the start of the history, rather than disappearing out from under you.
Importing alerts from another tournament
Section titled “Importing alerts from another tournament”Once you’ve built up a set of alerts, you can reuse it rather than recreating it. Tap Import alerts in the app bar and pick the tournament to copy from.
The button appears only when another tournament actually has custom alerts, and the picker lists just those tournaments, most recently changed first, each showing how many alerts it has.
Importing replaces the current tournament’s entire alert list. If this tournament has custom alerts of its own, you’ll be asked to confirm first. Either way the import is a single undo step, so you can back it out.
Reset to defaults
Section titled “Reset to defaults”Once a tournament has customized alerts, a Reset to defaults button appears in the app bar. It replaces every alert with the built-in defaults, after a confirmation dialog.
Individual alerts can be reset the same way: an alert that still carries a built-in name shows its own Reset to defaults button in its detail screen once you’ve changed it.